Monday, September 26, 2016

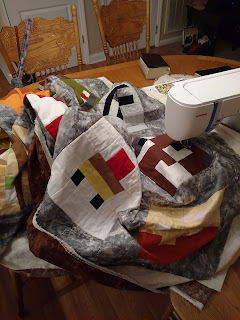
Beginning the row by row quilt

Last summer I collected Row by Row quilt strips from a number of places we visited in the past and this year, and I have begun constructing one from Kentucky's own Quilt Box.  Actually I'll make two from The Quilt Box so I can use one as a wall hanging and one in a quilt.

 Here it is, pressed and ready to appliqué.  I used double-sided WonderUnder by Pellon to attach each piece.  The big pieces were fairly easy, but the logs on the little cabin were NOT!  They kept wanting to curl up.  I found that a good press flattened them down.  Apparently I had forgotten to reverse the pattern for the state so initially it was backward, but thankfully I caught that before pressing the WonderUnder to the fabric.  Oh, and one piece that I ironed onto the iron.  Oops!


Once pressed, I began to sew the appliqué with a blanket stitch.


It's all sewn now although I need to draw the threads on top to the back and assemble the quilt sandwich. If you look closely, you can see the threads.  Oh, and I need to embroider the sun's rays too.


 I'll quilt this one myself so that's taking a little thought.  I'll probably quilt around each piece, offsetting the stitches about 1/4" or so but I'm open to ideas after that.

Sunday, September 25, 2016

Service project and teaching a new skill

Time flies!

I have been getting prepared to teach the young women at my church some basics about quilting.  I'm borrowing the idea from Missouri Star Quilt Company for their Super Easy Hourglass Quilt.  Their tutorial is here.


Last week, I cut 5" squares from about 6 different fabrics from my stash, hoping they work together well in this quilt.


Since then, I've cut 2 other fabric pieces so the girls will have 8 prints to choose for their blocks.

I also made one 4-patch block.  Here it is with some of the cut fabric squares.


I made a second 4-patch to sew 1/4" around the outside to the first one.  Then I cut diagonally from corner to corner to make 4 half-square triangle blocks.  I've laid the half-square blocks out as if I was going to sew them together.  Of course I'll wait for the blocks the girls will make so they are all mixed together and totally scrappy.


After the quilt is done, I'll take it to the Ronald McDonald House.

I think it will make a cute quilt for some child and am so excited to teach the girls to make it!


Wednesday, September 14, 2016

UFO from last December completed

I began making my very first quilt on December 6, 2015 here.  I ran into Amy Gibson's blog at Stitchery, Dickery, Dock where she explains how to make a Disappearing Nine-Patch quilt here.  

Yesterday afternoon after 2 days of not sewing anything, I pulled this quilt top and the fabrics for the quilt back out of the Committed Quilts bag and started cutting.  It's a simple quilt back.  I had decided to take one fabric and run it lengthwise down the middle and then cut the other into 2 long pieces and sew them to each side like this:


That was perfect until I realized that the quilt top was 96 inches, giving me no leeway for the quilter so I added a 10-inch strip in the center like this:


Don't you love my high technology?  This is my large kitchen white board that started in my husband's office, then used exhaustively for homeschooling, and now keeps track of grocery and to-do lists as well as ideas for quilt design.

I figured that it would look funny to add more material matching the strips because the print on the blue is large scale, making the error obvious anyway  so I reversed the fabric.

Here's what it looks like finished:


Here's a close-up picture of the blue fabric:


The long-finished quilt top:


That's the quilt folded in half.  The final quilt has 6 blocks down and 5 blocks across with sashing in between each.  As you can tell, I rotated the disappearing nine-patch blocks differently than Amy Gibson did.  

This entire quilt has been made from my stash as planned.  It hasn't exhausted my Christmas fabric stash, but the stash is greatly diminished.  I'll have to pick the binding out of it next so that will use even more of it.

Now the quilt waits to be quilted.  The final quilt size will be about 80"x96"--rather heavy to maneuver on my sewing machine.  I still have no idea how to quilt it either.  

I think I've come pretty far on this quilting journey and feeling happy about my progress.  How about you?  Have you already been quilting awhile or just starting out?  For the record, I'm pretty sure I'm still about a Beginner's level.  How do you measure your advancement?


Monday, September 12, 2016

Finally found it!

I keep reading everyone's blog posts that talk about once you get all the quilts made that your family can ever use, and I've been wondering when you reach that point.

I've made my first Comfort Quilt already because I felt so blessed to be able to quilt and buy fabric and have a supportive husband, and, and, and.  But I've been searching for a quilt to make Twin B.  When they were born, my sons' bassinets were labeled Twin A and Twin B.  Kind of like Thing 1 and Thing 2.

Twin B actually helped me find a panel for Twin A's quilt.  We won't mention how many years ago that was or that I haven't made it yet.  I have 1 1/2 years to get it done now!

Twin B has stumped me for a long time though.  Last weekend I found his quilt at the Quilt Expo at the Rising Sun Casino in Indiana.  I didn't buy it even though I went back several times to look at it and then kicked myself after I got home.  I managed to figure out which shop showcased it though and bought it over the phone so they will send it out Monday or Tuesday.  Yay!  I have a year to make it before he gets home, but I've already learned not to bypass fabric thinking, "Maybe later."  Fabric doesn't keep getting reprinted.  Kind of like some books but Amazon Marketplace isn't as helpful when searching for fabric.


I can't exactly explain why this fits him but it does.  I've been searching for something to do with cars but everything felt wrong.  I have been watching him learning and growing (and some of it has been really, really hard for him) and this quilt captures his essence of slaying dragons (or new, difficult experiences) and his courage at continuing to battle the evil forces.

This was actually one of the first quilts I saw when I walked into the Expo hall.  Why I doubted and didn't get it right off the bat, I'll never know.  The important part is that I've bought it now.  When I get it in my hands, I'll be so relieved!

Sunday, September 11, 2016

Getting real, part 2

My last post seriously bothered me because I made a green smoothie and went to work.  I'm sure there is room for improvement, but it sure feels better now!!!

The shelves:


This picture doesn't look super pretty, but it's a whole lot more functional!  The off-white Aldi bag has comfort quilts inside, the green one on the top shelf holds my Row-by-Rows I collected this summer, and the very top is full of smaller projects.

Each stack holds one type of fabric: Christmas, fleece and like soft fabrics on the top shelf; prints, solids and the comfort quilts on the second shelf; stripes, geometic, and random fat quarter stacks on the third shelf, and 2 stacks of dressmaker fabrics with the third stack on the bottom shelf being full of other holiday fabrics.  I don't have baskets on hand so that part will have to wait.

You can see the batting stack to the side of the shelves.  Here's another picture of that:

I have six bags of color-coded scraps, fat quarters, and larger (but not more than 1/2 yard) fabric on the floor, sewing notions and thread spools in the two boxes, and batting on top.  Quilting magazines and notebooks along with a scanner are on the side of the boxes.  Not sure why I'm keeping the scanner.  Goodwill maybe?

Last is the bag of committed quilt projects with all the fabrics required.  Two are almost done; I just need to screw up the courage to quilt them.  The Minecraft quilt really hurt my forearms near my wrist. Or I'll wait until my husband is employed again and hire someone else to do them.  The Christmas quilt back needs to be pieced together first too.


Filing is next.  Gag.  That requires decisions, not just sorting.

Oh--and I showed my daughter how the shelves are organized.  Very important because she pulls stuff out too!

Getting real, folks!

Has anyone else thought about doing Periscope or YouTube but thought, "Oh, I need to radically houseclean so my house looks fantastic no matter which way I point the camera!?"  For the record, I don't frantically houseclean when people come over so if you've been in my house, what you see is real.  It isn't terrible but it doesn't look like a Better Homes and Gardens cover.  Umm, I know people who live like that, and they intimidate me.

So I decided to show my sewing room but only part of it.  I'm not ready to be THAT real!

First of all, my sewing room is an all-purpose room.  It is also small.

We keep the family computer in there normally because it is visible from the kitchen.  No computers go into bedrooms.  Ever.

I have food shelves because in this era of minimalist kitchens, they forgot that some of us actually cook and want a bit extra on hand in case the bottle of paprika runs out.  Those of us who actually try to have something approaching a 3-12 month supply of food are simply out of luck.  So I have metal racks for food, and they're overflowing although not as much as I would like.

Then I have my filing cabinet with everything that hasn't actually made it into a file folder because my file is full.  It's time to eliminate stuff.  I'm no longer homeschooling so I probably don't need science lesson plans anymore (most of which I never used but compulsively collected).  I gave away two 2-drawer file cabinets when we moved here, leaving me with 4 file drawers.  I haven't gotten around to cleaning it out mostly because I'm dreading it.

Here is my sewing machine with my latest quilt-in-making on top.


The best part is the sewing machine itself and the view out the window!

When I actually quilt a whole quilt, I do it on the dining room table because I need more space!  The ironing board is right behind me so it's fairly convenient.  I have to get up to go around the ironing board, which isn't as efficient as turning my chair around, but I prefer to move around anyway.

This quilt is probably going to be going back into a bag because I have a couple of other projects taking precedence.  I also think I'm going to get a couple of plastic bins to separate fabric that is already committed into known projects so I don't pull something that's already committed for a quick project.

You can see the edges of two quilt blocks I've begun for Amy Gibson's 2012 BOM quilt on the wall that I'm trying to figure out how to bring together into the same quilt.  That's another post!

To the right you can see my messy stash.  Let's bring that into sharper focus.


Umm, yeah.  It's a mess.  Once upon a time, this was all very neat.  Then I started pulling this fabric and that out and sticking them back in.  There's no order to it now.  The mess on the floor is filled with fat quarters and scraps and a few finished projects looking for new homes.  The fat quarters and scraps are actually color coded in large 2-gallon plastic bags.  So there's some organization but that's why I'm wondering if it would be better to use bins or at least baskets to contain the fabric so at least it doesn't fall over.  You know--Christmas fabrics (I have lots) in one, dressmaking fabrics in another, fleece in another.  My goal is to use up this stash in about a year.

So there's hope!  It's my goal to minimize this so hopefully I'll be able to put up another post sometime soon (Christmastime?) with a much neater after shot.  It has gotten to that point that my peacefulness is disappearing in there.  Time to clean out!

Tuesday, September 6, 2016

A bug has bitten me! A quilting bug!

So last night after finishing the Minecraft quilt, I couldn't resist putting up another quilt.  I bought the fabric a long time ago, and I've been itching to do it.

The layup I did last night:


This morning I finished laying up the rest of the print rectangles on the floor because the design wall was full.  Then I started sewing the ones on the floor together:


That is the bottom quarter of the quilt.

Easy.  I bought the background and the prints as jellyroll precuts so I just had to cut them down to 8" and 10" lengths.  The directions are in the Summer BLOCK magazine and the video is here.  After the last quilt, an easier one is really nice to do.


Finished!!!

It's finished!!!  100% pieced and quilted and bound by me!  Design input from Jim!  We make a great team, I think!


Saturday, September 3, 2016

Almost done!

I want to show you my progress on the Minecraft quilt.  Originally I wanted to finish it today, but that didn't happen.  Next up, the binding!

Machine quilting on my sewing machine.  My right wrist got very sore from holding the fabric!


My husband held up the quilt after I finished quilting it.


Trimming off the excess from the sides to get ready for the binding.


Clipping threads from the back.  I matched thread on the front according to each block so I had lots of starts and stops.  Not the perfect way to do it, but Martha Stewart isn't coming over!!!