Showing posts with label finished!. Show all posts

Sunday, September 11, 2016

Getting real, part 2

My last post seriously bothered me because I made a green smoothie and went to work.  I'm sure there is room for improvement, but it sure feels better now!!!

The shelves:


This picture doesn't look super pretty, but it's a whole lot more functional!  The off-white Aldi bag has comfort quilts inside, the green one on the top shelf holds my Row-by-Rows I collected this summer, and the very top is full of smaller projects.

Each stack holds one type of fabric: Christmas, fleece and like soft fabrics on the top shelf; prints, solids and the comfort quilts on the second shelf; stripes, geometic, and random fat quarter stacks on the third shelf, and 2 stacks of dressmaker fabrics with the third stack on the bottom shelf being full of other holiday fabrics.  I don't have baskets on hand so that part will have to wait.

You can see the batting stack to the side of the shelves.  Here's another picture of that:

I have six bags of color-coded scraps, fat quarters, and larger (but not more than 1/2 yard) fabric on the floor, sewing notions and thread spools in the two boxes, and batting on top.  Quilting magazines and notebooks along with a scanner are on the side of the boxes.  Not sure why I'm keeping the scanner.  Goodwill maybe?

Last is the bag of committed quilt projects with all the fabrics required.  Two are almost done; I just need to screw up the courage to quilt them.  The Minecraft quilt really hurt my forearms near my wrist. Or I'll wait until my husband is employed again and hire someone else to do them.  The Christmas quilt back needs to be pieced together first too.


Filing is next.  Gag.  That requires decisions, not just sorting.

Oh--and I showed my daughter how the shelves are organized.  Very important because she pulls stuff out too!

Tuesday, September 6, 2016

Finished!!!

It's finished!!!  100% pieced and quilted and bound by me!  Design input from Jim!  We make a great team, I think!


Sunday, May 22, 2016

What does DONE look like?

Does anyone else struggle with prioritizing your own projects?

I'm really good at prioritizing other people's time but not so good at my own.  I wonder if that's why so many women go outside of the home to work, even when they don't have to do it for financial reasons.

Not only is it a struggle for me to prioritize my projects, it's really easy for me to feel overwhelmed with ALL the things I want to complete.  Shall I list all the quilts I've already put fabrics together to make?  How about the foreign language I want to learn?  And don't forget sewing for my own wardrobe or re-learning how to play the piano.  See what I mean?

One of the things I've struggled with is whether to do my own quilting, and I have decided not to do it myself right now.  There are several nearby women who charge really reasonable rates so I'll hire one to quilt my Hunter's Star quilt.  I need to get it completed by mid-July.  Totally done.  I hate the fact that I'm so far behind on my husband's Minecraft quilt so that might allow me the luxury of catching up on those blocks.  I really need some clothes too.  All of mine are too big.  Hooray!!!

My husband has been teaching me to apply AGILE project management techniques to everything I do, starting with the idea of knowing when I am done.  We just painted our main living area that houses the kitchen/dining/family rooms.  My husband painted the ceiling and I painted the walls with some help from my daughter.  I'm super happy with the result!


The room used to be a slate grey and is now a sand dollar color.  I need to buy about a quart of paint more to finish the kitchen.  Then it will be DONE!  I love the room so much more now.  Slate grey is not a color that encourages a family to gather around.  It's just a more warm, inviting place to be now.  For the first time since we have moved into the house, I go into the family room to sit and read or visit.  I think we bought 7 different colors to try on the walls before we found the one we liked best.

My Hunter's Star quilt tormented me all the while though.  It's fully pieced together, but the borders haven't been cut out or added.  Like I said, so had the Minecraft quilt so Saturday I talked it out with my husband and dropped some projects and prioritized some.  Most of the quilts will wait until next fall and winter so I have time to spend with my husband and daughter! I also decided to let someone else have the fun/headache of quilting the Hunter's Star.  Done for the Hunter's Star means to complete the quilt top in time to give it to my selected recipients (a secret.)  It does NOT have to be quilted by me.  I have gone through a Craftsy class to learn to quilt with a walking foot, and I've figured out how I could quilt that blanket, but I have a super short time frame to learn to do it well enough and then have to do it on such a large piece.  I've done just enough to begin to believe that I really enjoy the design and piecing part but not the quilting so much.

Today, though, I'm taking a break from all of that to do the Zombie Pigman.  We're heading out on vacation as soon as my daughter finishes her last final so this may be my only chance to do anything creative.  I have doctor appointments tomorrow and Tuesday and then I'm checking my daughter out of school early on her last week so she doesn't have to sit in the hall while her English class watches an R-rated show that I don't think appropriate.  (She agreed with that assessment and doubly so when she found out I was fine with getting her out of school a couple of hours early.  Bonus!)  Next week will be soon enough to add the borders onto my Hunter's Star quilt.


My colors are selected for the Zombie Pigman and I will be beginning as soon as I sign off here!

The lesson for the day is a simple reminder to allow yourself to take time for creativity, don't burden yourself with too many projects, and define what DONE looks like.

Saturday, April 16, 2016

When to say it's good enough!

I took a lengthy break from Minecraft skins, but I finished the Witch after completing the placemats.  Here she is.  (My daughter informs me that witches are always girls and boys are called warlocks.  The Harry Potter world certainly reinforces that idea.)


Back to Minecraft.

The witch caused me a lot of issues because it didn't make sense to me.  My husband helped me pick colors until he asked, "Would it help if you saw the character on the game?"

Immediately I responded, "Yes!"

Once I saw the pixellated figure on screen, I could see what I couldn't figure out before.  Unfortunately what I saw made me realize that Kelli had really simplified this and other blocks into something a beginning quilter could handle and have that important sense of accomplishment.  These animated figures are *highly* pixelated.  There is another quilter that I've seen on Instagram that works with probably 1- or 2-inch squares in order to attain that pixelated look.  I tweaked the colors that I used in this version because of seeing the real one, but I'm not sure I'm totally happy with it.

What I changed


Skin

The first thing I noticed is that the witch has grey skin, not flesh tone, so that made picking that color easy.  I've run out of the skin tone so I was searching for the next best color.  That picture above doesn't show the grey very well so you'll have to trust me.  It's light grey.

Top Row

I had to really study this to see what this figure was depicting.  You need to know that the witch is wearing a pointy hat.  There is a vivid green jewel or something at the front right above the brim, and then that green extends around the hat like a greyed-out green ribbon.  I didn't have fabric that looked remotely like that so I opted for the dark grey instead.  It would make more sense if you saw the hat continued to go up to a point, but there isn't room on the block.  By the way, the blue in the top two corners is sky.  I wished for a different blue fabric but didn't have anything I was willing to cut into.

The Black and Brown Strips

I'm still struggling with this or actually.  The witch should have a strip of skin exposed between her/his eyebrow and hat brim because his eyebrow should be black.  It's a unibrow so I'm calling it in the singular!  Obviously there would be no difference between the hat and brow if they were both black so I used dark brown for the brow.  

Nose

Yes, that's a nose.  Go figure.  My husband pointed out that the witch has a mole so I appliquéd one onto the witch's nose.  I also used a lighter shade of brown for her nose because, in my opinion, skin and hair should not match no matter what color either one is.  

Summary

Overall, I think this looks a turkey with a Pilgrim hat.  However, my all-important judge (my husband) is pleased with the overall effect.  I suspect I'm going to struggle with the translation between the actual pixelation and the blocks.  Knowing what the character looks like helps me translate the block, but I'm struggling with that perfection thing again.

Okay, that's my answer.  I'm leaving it alone and moving to the next one, the Zombie Pigman.  Yeah, I struggled with whether to leave that one as is or pixelate it too.  I'm leaving it.  I won't enjoy making it if I have to figure out how to do the pixelation, to say nothing of having to buy more fabric of the various colors.  Besides, the blocks wouldn't work together if I changed stride mid-stream!

Speaking of fabric, I'm out of skin tone and nearly out of black.  I'm beginning to wonder if I needed all the colors in the fat quarter pack since there are several I've not touched yet.  There are still a lot of blocks left though!


Wednesday, April 13, 2016

Almost there

It is amazing how slowly placemats can come together.  I finally finished the third one; can you believe it?  I've been learning a lot about putting together quilts though.  Today I sewed on the binding and the corners weren't laying down flat so I had to go back to watch some tutorials of how to do it.  I finally got it right.  Or almost right anyway.  Missing something still because the binding is still puckering slightly at the corners.  The placemat is laying straight and the puckering isn't noticeable.


I ran out of bobbin thread on the third placemat which took the rest of the spool.  Unfortunately, I didn't look closely enough and went out to Joann's to buy more thread.  When I got back home, I reorganized my thread holder and found another spool.

Oh well.  I'l be needing that color for the Flag blanket I'm doing next.  Unless I back and quilt the pink blanket next.  So many quilts to make and finish with close deadlines.

Here's my freshly made binding:


My daughter started making a dragon today since she is on spring break.  It is cut out and its arms are made.  I think.  She's finding out how challenging tiny pieces can be!  The pattern is available on Etsy.  Cute, huh?!  (Hers will be more of a turquoise-y color because that's what I had on hand from a sweatsuit I was going to make when I was 20-something.)


I love being able to make quilts, dragons, etc. out of my stash although I'm not sure I like what it's saying about my long-time fabric addiction.  I'm really glad I have all of it on hand right now though.  I wouldn't be able to satisfy this urge to create without it.  A lot of it came from a woman in Ohio who was clearing out her stash a year or so ago.  Not a day goes by that I'm not grateful to her!

Thursday, April 7, 2016

Flag Day quilt block

Craftsy advertised a darling flag quilt block for free on Facebook that I saw last Monday that I immediately downloaded.  Since my niece is getting married and I'm very into spending labor rather than money right now, I thought it would make a cute set of placemats out of my stash for her upcoming wedding!

I'm not done; in fact, I have only quilted two placemats so far, but I have learned a few useful tidbits!

First, here is the first one of the quilted placemats.  Free motion quilting isn't my bag yet so I used the walking foot for stitch in the ditch and echo stitching.


This is a close-up of the quilting stitches.

At this point, I used white in the bobbin so the stitching on the back is much more easily seen than on the front.


If you look closely though, you can see that each line of stitching was separate from the previous stitching.  Apparently this is not ideal.  You should try to use a single thread all the way through your quilt, NOT that I'm entering this in the county fair or QuiltCon anyway.  I stay-stitched the beginning and end of each line, but I didn't use any of the clever tricks to hide the ends of threads or keep them from bunching up.  I have now learned to draw the bobbin up through the quilt top and also to end the stitching by drawing the ends through the middle of the quilt sandwich.  Gail Kessler shows how to draw the ends through the middle of the sandwich to eliminate knots from pulling through in the free Craftsy class, Piece, Patch, Quilt: Basic Quiltmaking Skills.  (I highly recommend this class.)

Leah Day has quite a few invaluable YouTube quilting tutorials for using your walking foot such as Walking Foot Machine Basics too.

After watching Leah Day's tutorials, I got a little bit daring.  Not much but enough to pull out my fabric marker and free hand some zigzags into the next placemat.  I also replaced the white bobbin for navy although I left the white spool for the thread on top.

 I hadn't washed off the blue yet, but I think it helps make the quilting more obvious anyway.


The picture is upside down, and I have now rinsed off the blue markings so it is soaking wet.  I'll add a right-side up one when the placemat dries.  The backside markings are virtually invisible with the navy blue thread so I didn't bother with a picture.  I didn't use a single line of stitching, but I think I only cut the thread 4 times.  It went MUCH faster this time!!!

Because these are small pieces, I'm using 505 Spray and Fix fabric adhesive to hold the quilt sandwich together.  I'm not sure how to do bigger quilts yet although Gail Kessler's class above explains how to use safety pins.  I'll get there when I get there. :-)

Which takes me to my last point:


Never, never forget it! 


I wish I had learned that when I first learned to sew.  My mother laughed at how many mistakes she made, seams she ripped out, and taught me what places to worry about making perfect and places where it didn't matter.  I didn't learn it though.  I worried.  I fussed.  I made it perfect.  Therefore, I stopped sewing.  Life is kind of like that too.  Most issues aren't worth fussing over, and I'm finally learning that through quilting.

That's why quilting is so awesome.  It is so easy to just skip right over the errors.  Do you have any ideas how many mistakes I have made?  I don't either but I have only ripped out a handful of seams--and those would have been more noticeable, like one strip that said Celebrate that was upside down to the flag.  Since there is only one block per placemat, I ripped that seam out.  I think that was the only one I removed.

One more time:

Thank you!

Tuesday, February 16, 2016

Piecing completed!!!

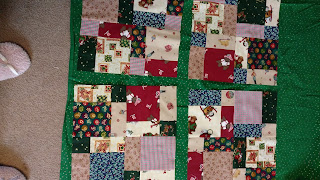
I finally finished piecing my disappearing quilt blocks for my Christmas quilt today.

 Yay!


Here's a picture of the stack of finished blocks with the Christmas tree block and the green fabric on the bottom that I've chosen for sashing.  So far I've only bought one small piece of fabric to make this quilt.  Unfortunately, I don't have enough fabric to make the quilt back or batting, but 99% of the top will be from my stash!

Now I have to make some big decisions like:

  1. How big of a quilt do I want to make?  Is it going to be a lap quilt, a blanket, or a bedspread?  Originally I had planned to make a queen size quilt because I have a queen size bed.  I'm not sure now though.  It might be nicer to have it to cuddle up in on the couch or reading a book.
  2. How am I going to lay it out?  I also noticed, while it was spread out on the floor, that these blocks will make a very scrappy, very busy quilt if I push all the pieces together.  I also went back to the original pattern and realized I had turned my pieces differently than the Amy Gibson at Stitchery, Dickory, Dock, contributing to an even busier pattern.  My eyes felt like they were fighting each other trying to find something to focus on so I decided to put sashing in between each block in order to reinforce some order and cohesion to the whole quilt.
  3. Because of #2, I want to make another quilt with the same fabrics to see what different affect might be had by turning the bigger squares toward the center of each block and also using a plain color for the center block.  This Christmas project may never end!
  4. If I made a blanket 5 blocks across by 6 blocks down, with 2 1/2" sashing in between each block, how big would the blanket be?
  5. If I put the Christmas tree block in the center of the quilt, would that also give a little more cohesion to the quilt? Or would that be better just to use as a pillow? Leaning that way especially since I don't have a dead center block if I put 6 blocks down and 5 across unless I appliqué it on the center top.
  6. Do I use a quilt as you go technique or just make the quilt top?  I'll probably just stitch in the ditch if I quilt it on my machine or tie it on my quilting frame.

Now onward to cutting the 2 1/2" strips for sashing. Step 3.

Neat quilts on the web!


On other browsing, I found this Christmas tree skirt from Missouri Star Quilt Company that I want to make out of my stash.  (See what I mean? This Christmas project may never end!)

A little late for this year's Valentine's Day, I think this dimensional mini-quilt from Made by Me in Red (directions by Moda Bake Shop) would be a really cute to make one or all of my kids for V-day decorations.  If only one, I'd have to choose my daughter because she does all the holiday decorations around here!

While you're at it, check out this patch pink rail quilt from Scrapbox Quilts!

And another link just because I love foxes!  If you follow Courtepointe & MOI's link to the patterns page, you'll find several fox quilt patterns.  The blog is written in French, I believe, but translated to English too.  These aren't free but they are cute!

Wednesday, December 9, 2015

Finished is better than perfect.


"Finished is better than perfect," says Jenny at Missouri Star Quilt Co. I heartily agree. I grew up hating WIPs. My mother taught me that because she always had half-finished projects from Relief Society work meetings. Relief Society is the women's organization in our church. She was in the organization's leadership, organizing and overseeing the function, so she never had enough time to finish the projects. I think the only completed projects we had were those that the sweet sisters in the Relief Society made for my mother. What sweet gifts! (Eventually, my mother threw out all of her WIPs, making those gifts even sweeter!)

Having said that, I've added several tutorials from other very creative (and skilled) ladies. My latest favorite blogger is from Freshly Pieced. Maybe eventually I'll advance to buying a book! In the meantime, I keep drooling over different pieces of fabric and jelly rolls. I really, really want to make something with a jelly roll!

Have a great day, and keep sewing! Next Wednesday I'll have something completed to show you. Maybe you will share some of your completed projects with me in the comments!