Monday, March 7, 2016

New week, new quilt--oops! UPDATE

Last week (or maybe the week before that), I cut out a bunch of squares for a Floating Squares crib quilt.  Here is a link for the tutorial:  http://land.missouriquiltco.com/floating-squares/.    I thought it would look so cute with these charms.  I admit that I may have fallen in love with the charm on the front!  It didn't hurt that the charm pack was on their daily deals list.  Yeah, that list is pretty much my downfall!

However, I wanted a colored background so I crossed my fingers and chose some fabric yardage online (I think it was 1 3/4 yards).  It turned out to be a little stronger of a color than I wanted, but I think it still looks good.

The cutting turned out to be the longest part of the whole process so far.  Here are the steps:

1.  Separate 30 charm squares.  I took out the reds and oranges because they seemed a little strong for the violet-pink.  These 30 charms (5"x5") will remain in a whole piece.


UPDATE!  2.  Cut 5" strips of the solid color fabric yardage and then subcut those strips into 5" squares so you are basically making charms.  Don't buy a solid color charm pack since you need 49 of these, which is a little more than one charm pack.


UPDATE!  3.  Cut 40 2"x5" rectangles.  You need 40 of these rectangles.  Do NOT cut them out of the 49 squares you just cut!!!  You can still use the same cutting strategy as step 2 by cutting 5" strips and then subcutting the strips into 2"x5" rectangles.  Much less waste that way too.

Sorry, no pictures of this one! 

4.  Now take about 5 of the leftover charm squares, and cut each square into 4 little 2"x2" squares out of each charm piece.  You need 20 little squares.

Nothing here either.  I need to remember to take pictures of the process!

That, my friends, is the hardest part of the whole quilt!  Now you are ready to sew the floating squares block.  I'm not even going to try to explain that in print; watch the tutorial.  Jenny Doane explains it very well.  Take my word for it though:  I'm a novice, and these were quick to put together!


I'll put all of the squares together into the quilt and post it later this week.  My son is leaving for a 2-year church mission early Wednesday morning so I don't anticipate having time to do anything further until at least Wednesday.  Glad and sad all rolled together into one.  Mostly glad though.  That will help me through the missing-him spells.  That and quilting. :-) 


*****UPDATE**********

I just laid this out, and discovered this is going to make a large crib quilt--very large 58"x48"--or a small quilt.  The patterned pieces are fine and the pieced pieces are fine, but there aren't enough solid-colored squares.  I need to figure out what I'm going to do now.  I'll get back to you as soon as I figure it out! 


Okay, you need 49 squares for this quilt and then you still need to cut 40 rectangles 2"x5".  It is about double the size of a crib quilt too.  I have revised the directions above.  The tutorial is a good one, but this part was misleading.  The binding tutorial can be found here.

Wednesday, February 24, 2016

My husband is a champ!

Today I wrote down 3 goals to accomplish.

First, I needed to find a video showing how to sash a quilt.  Done.

Then I got my husband's shirts ironed and various other tasks that need to be completed.

I finally got down to the business of beginning to sash my quilt (goal #2).  When I began sewing my third block to the sashing, I realized that some of my blocks were definitely smaller than others so that made one decision for me.  I cut down all the blocks to 12 1/2 inches square.

At that point, I made dinner for my husband (and family.)  It was totally off THM plan because I used noodles for pork chops and noodles, and they weren't Not Naughty noodles.  They were completely naughty but I totally stayed away from sugar!!!  Sugar doesn't play nice, and I was not going to have a migraine to celebrate our 22nd wedding anniversary.

This is what my husband brought home for me to celebrate our day.  (He had planned to take me out to dinner, but I didn't really want to go out tonight.  Like the champion that he is, he was okay with that and cancelled the reservations.


Gorgeous roses!  I love roses, and their fragrance is even more beautiful than their form.  I think my husband is awesome!  I love him so much and am so grateful he is my patient, fun, and wise husband!  I may have fallen for him because he makes me laugh, but I've stayed in love because he is the perfect complement to me and helps me so much.


Not only was he willing to stay home with me (our kids took off for youth group meetings at our church), he encouraged me to finish the last goal on my list for the day.  He helped me figure out how much fabric and what sizes I needed to cut for the sashing for the Christmas quilt (which he has laid claim to.  I think he's afraid I might not finish it otherwise.)  Then he practiced his violin while I cut and sewed.  

Now I have finished my first row of the quilt!


How blessed can a girl get?!

Sunday, February 21, 2016

Elven Garden

I just found some information on Free Motion Quilting (FMQ) on the Elven Garden Quilts blog.  Here is the link:  http://theelvengarden.blogspot.com.au/2014/07/free-motion-qal-choosing-colours.html.  There are more links at the bottom of the page.  I had wondered if it might be best to either tie or stitch-in-the-ditch quilt my Christmas quilt, and one of the posts reinforced that thought.  I think that might be the best strategy for me as a beginner.

Also here is a cool Minecraft tutorial:  http://www.thatlookslikeitneedsstitches.blogspot.com/search?updated-max=2016-02-17T12:42:00-08:00&max-results=1

Just wanted to pass those along!

Tuesday, February 16, 2016

Piecing completed!!!

I finally finished piecing my disappearing quilt blocks for my Christmas quilt today.

 Yay!


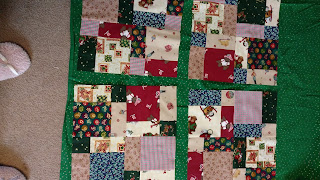
Here's a picture of the stack of finished blocks with the Christmas tree block and the green fabric on the bottom that I've chosen for sashing.  So far I've only bought one small piece of fabric to make this quilt.  Unfortunately, I don't have enough fabric to make the quilt back or batting, but 99% of the top will be from my stash!

Now I have to make some big decisions like:

  1. How big of a quilt do I want to make?  Is it going to be a lap quilt, a blanket, or a bedspread?  Originally I had planned to make a queen size quilt because I have a queen size bed.  I'm not sure now though.  It might be nicer to have it to cuddle up in on the couch or reading a book.
  2. How am I going to lay it out?  I also noticed, while it was spread out on the floor, that these blocks will make a very scrappy, very busy quilt if I push all the pieces together.  I also went back to the original pattern and realized I had turned my pieces differently than the Amy Gibson at Stitchery, Dickory, Dock, contributing to an even busier pattern.  My eyes felt like they were fighting each other trying to find something to focus on so I decided to put sashing in between each block in order to reinforce some order and cohesion to the whole quilt.
  3. Because of #2, I want to make another quilt with the same fabrics to see what different affect might be had by turning the bigger squares toward the center of each block and also using a plain color for the center block.  This Christmas project may never end!
  4. If I made a blanket 5 blocks across by 6 blocks down, with 2 1/2" sashing in between each block, how big would the blanket be?
  5. If I put the Christmas tree block in the center of the quilt, would that also give a little more cohesion to the quilt? Or would that be better just to use as a pillow? Leaning that way especially since I don't have a dead center block if I put 6 blocks down and 5 across unless I appliqué it on the center top.
  6. Do I use a quilt as you go technique or just make the quilt top?  I'll probably just stitch in the ditch if I quilt it on my machine or tie it on my quilting frame.

Now onward to cutting the 2 1/2" strips for sashing. Step 3.

Neat quilts on the web!


On other browsing, I found this Christmas tree skirt from Missouri Star Quilt Company that I want to make out of my stash.  (See what I mean? This Christmas project may never end!)

A little late for this year's Valentine's Day, I think this dimensional mini-quilt from Made by Me in Red (directions by Moda Bake Shop) would be a really cute to make one or all of my kids for V-day decorations.  If only one, I'd have to choose my daughter because she does all the holiday decorations around here!

While you're at it, check out this patch pink rail quilt from Scrapbox Quilts!

And another link just because I love foxes!  If you follow Courtepointe & MOI's link to the patterns page, you'll find several fox quilt patterns.  The blog is written in French, I believe, but translated to English too.  These aren't free but they are cute!

Tuesday, February 2, 2016

Duh!

So far my silliest (and most annoying) error has been to replace my cutting blade and then have terrible times cutting fabric.  It was on my Fiskars blade that is stiffer when opening and shutting than my Olfa blade.


But I could not believe that I had to seesaw back and forth repeatedly to get it to cut!

Ridiculous!

Terrible cuts!

And then one day (about a week later) I noticed that there was a lot of lint from the rough cutting.  Being economical cheap, I had insisted on using that doggoned blade.  I cleaned off the lint and then realized that some was stuck and would not budge.  Figuring that I had a knick in the blade (and possibly the reason for the rough cutting, I tried to pull it out.

I finally woke up to the realization that I had not one, but two, blades on the handle.

Yeah, don't do that.  It cuts amazingly well with one blade now.

Tuesday, January 26, 2016

What about thread?

I was thrilled to finally get my new machine back home late last week!

Another lesson I received at my sewing tutorial was the value of good thread, or rather, a scolding for using cheap thread!

I had Coats & Clark, Dual Duty thread, in my machine.  The instructor taught me that was probably the reason my machine was making a clacking noise and that the repairman would probably scold if he saw that thread.  

As an easy guideline:  Don't buy the cheapest thread at the store unless they only carry Gutermann-type quality threads.  My drawer is full of Coats & Clark which, it turns out, is made with a mix of cotton and polyester.  Ahem.  The polyester in it stretches and stresses your sewing machine.  If you try to break the thread or just try to pull it between your hands, you will easily see it stretch. 

The top thread especially is under tremendous pressure because of the stretch, and you will get better results and keep your machine in better shape if you spend a little extra on higher quality, all-cotton threads.

I had that graphically illustrated to me this weekend.

I decided to make a Valentine's Day pillowcase with an appliquéd heart for my son in California.  And I wanted to make it RIGHT NOW while watching Minions with my family.  I cut 25 2 1/2" squares to piece into a heart.  I placed them in 3 rows of 6, 1 row of 5, and one row of 3 and cut a paper heart pattern to fit that.  


Unfortunately I realized that I didn't have a contrasting thread to appliqué the heart unless I drew from my Coats & Clark stash (where I found a perfect color.)  Before reaching the halfway point around the heart, my Janome began making the clacking sound again.  Ugh.  I finished the border stitching but selected off-white Gutermann thread to quilt the heart--not what I had initially planned to use but among the three colors I had available.


I also learned that those who have been freehand quilting for awhile make it look much, much easier than it actually is (so don't look too closely at it!)  


Monday, January 11, 2016

Things to remember from my sewing lesson

Last week I had another sewing lesson at Luke's Sewing Center and realized that I should have been signing up for lessons much more frequently than I have!  I learned a few tricks too.

One of the most important for piecing quilts is that you can use your 1/4" foot (please do!) but then you can fine tune the measurement by moving your needle!!!  I had been very frustrated because the sewing machine directions did not tell me to do that and the foot itself, even with moving the needle to the right-most position was still too big so I had to eyeball it.  Sometimes I was right on, sometimes I wasn't.  My Janome allows me to edge the needle both right and left by fractions at a time so I can get the scant 1/4" necessary for a successfully pieced quilt top.  I would take a picture, but I also left my machine at the shop for the 1-year cleaning before my membership expired and I would have to pay for it myself.


Needles.  She suggested changing needles after every project.  If you hear a slight thumping sound, it could be a blunt needle driving through the fabric.  Not good on either the fabric or machine.  She said Organ needles were good and cheap enough to replace frequently.  She also explained the need to use the proper needle per the fabric being sewn.  I have been good about that! She also scolded me for using Coats and Clark thread.  Apparently it stretches and causes issues with the machine because of the stretching and it will also cause a funny sound as the sewing machine works. It also is more likely to pucker due to the stretch factor.

Another thing the instructor taught me was to work through each pre-programmed stitch on white fabric tape (not sure what it's called so I'll add a link tomorrow), playing with the length and width of the stitches, and then placing each one with the exact measurements I had used (written on the fabric tape) inside a photo album so I could see what each looked like to choose what to use on a particular piece.  I'm thinking a notebook with baseball card holders would be perfect.

She also taught me to use a stabilizer whenever sewing two pieces of fabrics together, sometimes a tearaway, sometimes wash-away, sometimes neither.  I had not known there was such a thing as a wash away, but the stabilizer keeps puckering at a minimum, especially when using a walking foot to join the fabrics.  (This includes hemming although I don't think you'd use the walking stitch there.)  The wash away stabilizer would be invaluable when sewing a rolled hem on fragile fabrics.


I also picked up some fat quarters at Joanne Fabrics to make a quilt for the Ronald McDonald house last week.  I feel very blessed to never have needed them but I think what they do is amazing.  Luke's Sewing Center has a sewing meet-up every month to make them quilts so I bought this for a quilt top.


Since my machine is still at the shop, I have not been sewing but I have been reading!

I read this tutorial on making absorbent burp cloths this morning and plan to make them for the next baby arrival!  She includes a link for the pattern template as well as excellent directions too.


I also read this book, The Spirit Catches You and You Fall Down, by Anne Fadiman, this last weekend and loved its attempt to bridge the gap in cultural insensitivities.  How much better would our world be if we loved first and left judgment to later?