Showing posts with label Hunter's Star. Show all posts

Friday, August 5, 2016

Remember the Hunter's Star quilt?

My parents loved it!  I was so grateful that my very first completed quilt was for them.


While we were visiting, we did lots of other stuff too.


I helped can apricot puree.


Croquet.


I began reading this book.  I highly recommend it and have started supplementing my diet with some amino acids.


Fireworks and parade for the Mormon Pioneer parade.


A photography lesson with a local photographer, Michael Scott Phillips:


A trip to Tony Grove Lake (up Logan Canyon) with a detour to Bear Lake for gas!


And then a 14+ hour trip home via Phoenix and Dallas.  Have you ever seen the Dallas airport at 2:30 in the morning?  It's empty.


Now we're home again. 

It was wonderful to visit family, but it is also good to be home.


Tuesday, June 28, 2016

Summer is here! It came! It came!

What came?

My Missouri Star BLOCK magazine!  Summer fun can begin although I probably won't be doing that much quilting.  We have travel plans coming quickly, my husband starts a new job, and then school starts too soon in August. :P  BUT this mag actually helped me put on the fun attitude so I don't get bogged down in details.


Making it even better, it has directions for some of the quilts I've wanted to make like Stacks and floating hexagon quilts.  They also included a patriotic remake of the Friendship Star Sashing that got me excited to try.

I really like how the magazine suggests different fabrics and combinations so I can start visualizing the quilt patterns from Jenny Doan's YouTube tutorials in different colors.

Along with quilt patterns, Jenny tells stories to get me thinking of my life in terms of the high points instead of the shoulda, coulda, woulda slant.  I need that!!!

Some of the patterns include the Dresden Botanica, a quilt I never would have even watched a tutorial for but am intrigued at trying now.  Okay, so it's not going to happen first, but that's because I already have one in progress and more waiting on my shelves!

A new I Spy quilt follows with a delightful family stories that, again, got me fired up to try.  Summer in the Park reminds quilters that quilts are meant to be used and loved and looks easy.  In fact, the themes of summer and dirt and FUN resound throughout this issue!

Rhombus Cube reminds me to keep it simple, the Jelly Basket just looks like fun and seems to encourage it, Dandy Stars reminds me of the joys of children and the walks we used to take to the library, grocery store, and around the neighborhood.  Jenny didn't ignore the fact that it was often hair raising but always an adventure!

Wallflower goes into the power of remembrances and duplicating those to pass onto further generations.  I have a starburst quilt from my grandmother that I think I'll duplicate for my kids in the coming years.

Floating hexagons came with a delightful story.  This is one I already bought fabric and the template to make so I'm happy to have the written pattern.  I learned my lesson with the Hunter's Star quilt!

The magazine includes a heartwarming story about a quilty proposal that is fun to read.  And of course they end the whole issue with a continuation of the mystery story.  Cheesy but so lighthearted!

It's well worth $5.99 and my summer looks brighter with new ideas and attitudes!  Thanks MSQC!

Friday, June 24, 2016

Disaster strikes my sewing room

Oh dear.  It has been over a month since I've blogged!  I'm so sorry!  We've gone on vacation, I've finished the Hunter's Star quilt top, I've done some cross stitching, but I've blogged about none of it!

One of the major things that has happened is this:

It's not what is outside although the weed jungle is growing like mad with all the rain we have had.  My husband is taming it now that he has more time for yardwork.  He was laid off--did I mention that?  The picture also doesn't just show that my sewing machine table is a mess, but that's a major clue.

I finished the Hunter's Star and programmed my machine to write a label for it, and then forgot to change the presser foot.  The needle came down, broke in the machine, seriously messed up the timing, and the machine began shredding thread.

Even though I took my machine to the dealer's the next day (two weeks ago), the repairman attended training for at least a week so I still don't have it back.  I even tried sewing more blocks on my old Viking that is now my daughter's.  Getting the 1/4" seam right on a different machine is hard though.  Hopefully I really will get my machine back in a week because I have to sew the binding on the Hunter's Star quilt when it comes back from the quilter.  All before leaving for vacation the following week.

I have done these blocks so far on my husband's Minecraft quilt.


Notice the white chicken on the bottom row.  It was one of Kelli's bonus blocks that my husband preferred.  Since I've already purchased the sashing fabric and back, we picked and chose the blocks my husband wanted most and I'm putting all these blocks on the front.  Kelli recently posted a pattern for the pickaxe that I'm going to make for one of the blank spots although I'm changing it a tiny bit.  I spent last night graphing out a diamond sword for the other blank spot and figuring out how to make it without making it look appreciably different than the others, i.e., more pixelated.  I'll be publishing instructions for it soon--as soon as I write them up.  Making it into a 12" block was much more easily said than done.  I have no idea what software Kelli uses so I used graph paper and pencil.  I'll probably post pictures of that.  Very high tech--not!

Kelli has also created a large dragon for the back of the quilt that I'm duplicating too.  Here's the link to the tail section, mid section, and head.  Of course that means I bought far too much backing fabric.  Oh well. It will look cool when it's done after I get my sewing machine home.

Sunday, May 15, 2016

Major milestone celebration!

April 18 saw my first Instagram picture of my Hunter's Star quilt so I guess that was close to when I began it.  I cut the layer cake into 4 squares as of that date.

Now I have the pieced part DONE!


And um, it feels like I've been working on this forever.  Can I hear Celebrate! now?

https://www.youtube.com/watch?v=3GwjfUFyY6M

The back isn't pretty, the 1/4" seams are far from perfect, the seams aren't always pressed to one side, and the seams didn't always nestle together because they had to go the same direction, but it's DONE and it actually looks pretty.

Miracles happen.  Every day.


Wednesday, May 11, 2016

Hunter's Star (long)

Oh my!  I thought I had posted more about my Hunter's Star Quilt that I am making.  The last post addressed that quilt, but that is the only post about it that I could find.  So sorry about that!  Here's a picture of the quilt on my design wall (from Fons and Porter--a little bit short but it will do better than the floor!)


Several months ago, I watched Jenny Doan's quilt tutorial about how to make the Hunter's Star quilt.  I fell in love with that quilt and bought the exact fabrics that she used.  What I didn't realize was that the Hunter's Star was a more advanced quilt block, even using her simplified instructions.   There are a few things I wish I had noted earlier:

1)  I needed one more charm pack of the print fabric in order to follow the same schematics as the tutorial.  There are far fewer purplish prints in either the charm pack or layer cake than any other color.  I actually raided my stash from the floating square quilt for one additional square because I ran short after buying the extra charm pack.

2)  The hunter's star is broken into four quadrants on her quilt, hence the need for more charms and unpicking.

3)  I wish I had ordered the Block magazine's Holiday 2015 issue because that's where the written directions are contained (I think.)

4)  I would highly recommend using only two colors for a first quilt, such as blue and white, red and white, batik and solid, a single print and solid, and so forth rather than a mixed print.  It wouldn't be so hard to coordinate.


4)  On another tangent, the Block magazine is fabulous reading!  I just received and devoured the spring 2016 issue.  Get the paper mag!!!  I know it's just another thing to store, but I'm finding I'm printing out a lot of pictures from the tutorials and Google searches.  The magazine is cheaper, I think.  Here's another quilt I want to make.  I love this green shade because it makes me think of my mother.  She loves this shade of green.  I may or may not have ordered the fabrics. :-) The 4-patch and strips quilt also drew my eye but I'm more inclined to pick my own fabrics for that so there's no rush.


Back to the Hunter's Star

The steps to creating the Hunter's Star quilt:

Make the half-square triangles for the 28 star blocks.  Hopefully your math will be better than mine!  Then you trim each of those down to 2 3/4 inch squares and trim off the tag ends.

Some of these are trimmed while others are waiting to be cut down.

All trimmed!

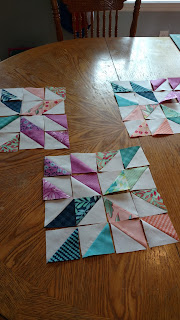
Next, lay them up into the star blocks.  The second time around, I put the colors in quadrants.  After unpicking seven whole scrappy-style stars.  


I HIGHLY recommend laying out each set of stars before sewing them together so you can be sure the prints play well together.  Then I found that the backs were easier to work with (and will probably be simpler to quilt) if I sewed each row together before attaching one row to another.  In the tutorial, Jenny sewed each quadrant together, but the bulky seams are atrocious doing it that way.  (Another unpicking session resulted for me when I realized that.)  I don't have pictures--I'm sorry!


For memories' sake: (I got lots of practice unpicking stitches!)


Note that there are two kinds of stars.  One moves to the right and the other to the left (12 and 16 of the respective blocks) so pay attention to the pattern: (Here's the sketches I mocked up.)


After that, piecing together 28 of the 4-patch blocks will seem easy peasy!  Take the white and print charms and sew them together--again according to the instructions.  You will rotate these on the quilt so the prints have to be in the top right and bottom left corners when you piece the blocks together.


And finally, we get to the final lay up on the design wall.
Seven blocks across and eight down.  The first row begins and end with star blocks from the stack of 16.  Orient the blocks according to the tutorial.  The second row uses the star blocks from the stack of 12 with the 4-patch blocks going the opposite direction from the ones in the first row.  I'm pretty sure I got that right.  Jenny kept talking about the orientation of the print, but I got lost there.  I'm a visual learner so pictures did the trick for me.

Last step is to sew all the blocks together before dealing with the borders and binding.  I'm toying with using the remaining charm squares by piecing them into a binding strip.